Sassoon Infant
$74.77Upright letterforms for pupil materials; 8 styles.
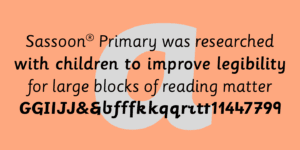
Rosemary Sassoon, a designer for many years, has been mainly concerned with letterforms. Additionally she specialised in the educational and medical aspects of handwriting. After discovering that no one had found out what kind of letterforms children found easiest to read, she spent two years of research on the subject before designing the original Sassoon Primary typeface.
Showing all 15 results


End of content
End of content